Tuesday, October 7, 2014

Goofy Greetings or Greetings Getting Goofy...

 Ideas for 4th Grade & Older Students:

So now you have introduced Kehillah (or Morning Meeting) to your students.  Greetings, are well, they are getting a little goofy.  But yet, you know the importance of helping each student feel part of the group (validated and recognized), of making sure everyone knows each other’s name and providing opportunities to extend derech eretz – all necessary in building a class into a community.  So what to do…

Responsive Classroom secular school teachers* are a great resource, and have ideas that will work in our religious school environment.  Try out some of their suggestions (tweaked by me):

·       Practice a Hebrew Greeting (If you are comfortable with this):  How are you?  Or My name is? Teach the students a few Hebrew words to use as answers.

·       Pass the Greeting Ball: Ok, you know this one.  Student 1 greets Student 2, Student 2 says the greeting back to Student 1 holding onto the ball. Then Student 2 tosses the ball to Student 3 and greets Student 3, etc.  VARIATIONS for OLDER STUDENTS:
o   Second time around.  Silently (no greeting or talking),  but this time the students have to repeat the pattern of who the ball goes to next.  Again – now time it. Faster.
o   Repeat above – but now add one more ball, going around in the same pattern. Then add another ball.
o   Do Greeting ball the first time.  Now reverse the pattern and tweak the greeting.

·       Cross Circle Greeting: One by one, students greet someone sitting on the other side of the circle who hasn’t been greeted yet.  Perhaps use a theme – find someone wearing the same color as you… Use a signal to indicate – been greeted (arms crossed, sit down, thumbs up).

·       Mix Match Cards: Create a set of ‘cards’ (on the computer) with Questions & Answers or Go togethers (Abraham & Sarah, Isaac & Rebecca- or something related to the learning topic). Find your match – greet each other, perhaps ask a set question (sharing)… this can be count as an activity also.


·       Pantomime Greeting:  Student 1 pantomimes something about herself (favorite sport, hobby,).  Class says, “Boker Tov  XXX” and mimics the pantomime.  Repeat around the circle. Variation:  add pantomimes from each student as you go around.  Time it, try for speed.

·       One Minute Greeting:  use a Goofy or Fun Greeting signal (elbows, hand jive, etc).  In one minute students have to greet as many students as possible (teacher and madrich also play). Must look each other in the eye and use names!


Remember to model, teach and reinforce proper greeting techniques: eye contact, being respectful, using proper words and body movements… and have fun!


*taken from The Morning Meeting Book K - 8 (3rd Edition) by Roxann Kriete & Carol Davis

Wednesday, October 1, 2014

Kehillah (aka Opening Circle, Morning Meeting): What is it?

At Temple Sinai we call it Kehillah – Community – time at the beginning of each class session.  Also known as Morning Meeting or Opening Circle.  Each Sunday morning, our classes spend about 20 minutes focused on getting to know each other better, focused towards becoming a community (kehillah) that respects and cares for each other.  We use the Responsive Classroom guidelines for Morning Meeting.  

Haven't tried implementing an Opening Meeting? Start with the Greeting and add new steps as your class is ready.  

Today I am sharing a bit about each component of Kehillah – then in my next blog posting I will share a few ideas geared specifically for the 4th grade and older population.

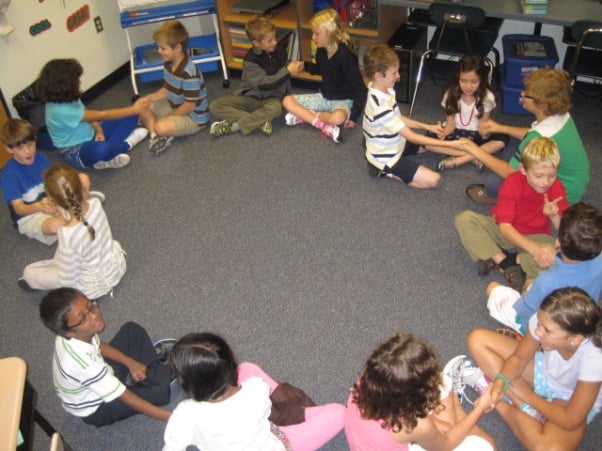
Kehillah time begins with the students gathered in a circle, usually on the floor, though the older grades usually sit in chairs.  The teacher, madrich and any other guests in the room at the time, join the circle and are active participants.  Components of Kehillah are done in the same order each week, creating a routine.  
Greeting:  The purpose is for the students to learn and use each person’s name, to recognize each member of the community and to make each person feel welcomed.  We practice the mitzvah of hachnasat orchim, the welcoming of guests, a core Jewish value.  

Sharing: The purpose is for students to learn more about their classmates, finding commonalities and differences; also providing a chance for students to share bits about their own lives.  Sharing might take place in concentric circles with students sharing to the person in front of them in the circle, to a partner (might be quickly counted off by teacher, find matches with an activity, etc.), 
one person sharing at a time and each person listening, 
voting – thumbs up/down; move to corners 
or sides of the room, show of hands, standing or sitting, in small groups or as part of the larger group.  Sharing begins with a question from the teacher that  the students will respond to during the sharing.  Sharing might be combined with the Activity – for example the activity might involve finding someone else with the matching card, then sharing with the partner.

Group Activity: Now it’s time to be active in a short lively activity that helps build community and allows everyone to contribute.  FUN!  May include a content component that helps move on the lesson or reinforces previous learning, or may just be fun.  Ideas for including a content component will be in the next blog posting.

Kehillah Message:  Students read the message (already on the board or chart paper) silently when they entered, and responded to a simple question that was written at the end of the message.  The message is brief, and references the activities and/or focus of learning for the day.  The last part of Kehillah is to read this message aloud. 

A few tips for Successful Kehillah
·       Set clear behavioral expectations. This should include listen to and look at the person who is talking, keep your body under control and be respectful to all.
·       Teach and Model Appropriate Behaviors:
o   Describe the expected behavior.
o   Students might articulate the behaviors expected.
o   Teacher or student demonstrates the expected behaviors, as others watch.
o   Ask students to point out the positive behaviors demonstrated.
o   Practice again if needed.
o   Now do the activity, but be prepared to stop, and use redirecting or reminding language if needed.
·       Start with easy to ‘do’ greetings and activities.  Chose ones that do not require multiple directions or a lot of movement.  As you and the class feel more comfortable, branch out.
·       Be sure you know the directions. Walk it through in your mind. Be prepared!

Our goal at Temple Sinai?  A classroom that is a true community, that values its relationships and each other. A community that cares about each other, and has fun together.  A true Kehillah!  


What works for you in Kehillah (Morning Meeting, Opening Circle)?  Share some of your successes or concerns!


Friday, September 26, 2014

Kids will be Kids Part 1…


So you have established classroom rules, your students have practiced responding to the quiet signal and they know some of the routines, but yet, well, they aren’t always doing what they are supposed to be doing.  In other words, kids are being kids.  They will test the rules, and push the limits.  A little, or for few – huge stretches.  What to do?

Reminding Language – helps students remember the expectations*

Reminding language helps children develop feelings of autonomy and competence, leading to self-control and intrinsic motivation.  Expectations become clear, and students respond because they know they will be expected to remember them and behave accordingly (Responsive Classroom).

Key #1:  Base your reminders on Clearly Established Expectations:
Example: Lack of Respectful Listening (talking while teacher or classmate is sharing, etc)

Step 1: Respond with Discussion - “Our rules say that we will be respectful.  If someone is sharing their answers or thoughts, what will we be doing to show our respect to the sharer?”  Note: teacher refers to Brit Kitah rule: “BE RESPECTFUL”. 

Students are called on to share their answers of what it means to be respectful when someone is talking: “Not talk.” “Look at the person who is talking.” “Keep our hands to ourselves.”

Step 1b: Respond with Interactive Modeling (after the above discussion or without discussion) -  The teacher models what respectful listening looks like.  Then ask the students what they noticed; how she is quiet, looks at the speaker with interest, and how her hands and feet are still and in appropriate places, and how she raised her hand when she wanted to a turn to speak. 


Step 2: Practice – The teacher begins to give directions or read from a book, and after a moment, stops and remarks like this, “I feel respected.  What were you doing that helped me feel respected?”  Then the teacher guides the students to do the crucial steps of naming the positive behaviors the students were doing that demonstrated their respect.   Remind the students to use their respectful listening behavior as the lesson continues.  And later, as needed use reminding language to reinforce the respectful behaviors needed.

Examples of Reminding Language for a Variety of Situations:

Preparing for Transition: “What will you need to do so you will be ready…”  “Think about how you will help each other…”

During the Transition: “Jacob, what do you need to be doing right now?” “I’ll begin when everyone is ready.” “What could you do if you have a question?”

Before or During a Whole Group Discussion: “What can you do if you have an idea to share, but someone else is talking?” “How will you let the speaker know you are listening?” “Sara, what do you need to do with your hands so Isaac can concentrate?”

Just as our students need to practice to use the appropriate behaviors, teachers need to practice using reminding language.  Try it. And try it again.  It will take practice!

Next: Redirecting Language in Kids will be Kids Part 2


*Taken from Responsive Classroom Resource Book ©2014 by Northeast Foundation for Children, Inc. 


Kids will be Kids Part 2


Of course kids will be kids… they talk out of turn, run down the hall, jump to be first in line and they forget to keep their hands to themselves.  Expect your students to be, well, kids.  Kids will make mistakes, break rules and try out your patience.  It’s their job!  Your job is to keep children safe and class time productive, even when their self-control is failing them.

Redirecting Language: Giving Clear, Nonnegotiable Instructions*

Redirecting language helps students act differently and at the same time preserves their dignity and sense of belonging to the group.  Effective redirecting language:

  •   is direct and specific
  •   names the desired behavior
  •   is brief
  •   sets firms limits (if necessary, action follows words)
  •  makes a statement instead of asking a question

Situation:  Your students are sitting on the floor, listening to a story or ready for Kehillah (morning) Meeting.  Jacob is using his hands to pester the child next to him.  Redirecting language is quick and to the point:

“Jacob, hands in your lap.”

Situation: Students are working independently at the tables.  Rebecca leans across the table and is trying to engage Rachel in a conversation, not allowing Rachel to concentrate.  Redirecting language is specific and clear:

“Rebecca take your paper and sit at this table, 
where you can pay attention to your work.”

Situation: The class is walking towards T’filah (prayer time).  Eli takes off in a run.  Redirecting language states the desired outcome and commands respectful behavior.

“Walk.”

Situation: You are about to give the directions, but students are already leaving the circle to head to their tables.  Again, clear commands, respectful behavior.

“Stop… Wait to hear the directions.”

Situation: The students are busy working in groups, noisy and eager to create skits to present to their classmates.  The teacher wants to issue a reminder of what to include in the skits.  The teacher starts talking, giving a series of directions.   A few students turn to listen, and begin to follow the directions, then move on to something else.  Redirecting language is brief and to the point:

Teacher uses the Quiet Signal, and waits for everyone to look at him.
Or says; “Stop, all eyes on me.”  Once everyone is listening, then the teacher
gives simple and clear directions.

Situation:  The teacher wants the student who is walking about the room to take a seat.  The teacher says, “Will you take a seat now?”  Or a student continues to talk when the teacher is waiting to get started, and the teacher says, “Are you ready to listen?”  In these cases, the student might be thinking “NO”, because a choice is implied.   Redirecting language tells the student what to do.

“Eyes on me” or “Sit here.”

Examples of redirecting language:

“Hands down while someone is speaking.”

“Tell your feet to hold still.”                                               

“Pick up the paper on the floor.”

“Wait for the blessing before starting.”

“You have one more minute to finish.”

“Put the scissors down.”

The key to using redirecting language is to think in terms of using positive actions in terms of a statement.  On the metro, driving in the car, at home with your own children – try it out.  Less words is best.  Direct and to the point.  Say what you want them to do. Wait for this to happen before you move on.


*Taken from Responsive Classroom Resource Book ©2014 by Northeast Foundation for Children, Inc. 


Tip for Day 2 and Beyond...


So you made it through the first day of religious school.  You met the students, and some of the parents.  Faces with the names.  What next?

How should Day 2 start?  (and Day 3, 4, 5 and beyond)

#1 Tip of the Year:  Be prepared.
Arrive EARLY and prepare your room for the students BEFORE they arrive. 
REALLY!
What does that mean?
·       Agenda on the Board:  Write your agenda of the day of the board.  I suggest using a basic outline of the day’s events with times written just for specials (music, art).  Why?  Knowing what to expect helps students with transitions.  Almost eliminates the question “When is SNACK?”.  Also helps you stay on track.  Helps the madrich/a know what to expect.

·       Supplies and Copies for the Day:  Gather all of the supplies you plan to use that day.  (Hopefully these are written on your lesson plan in the materials section.)  Lay them out on your teacher table/desk in the order you plan on using them. 

·       Sponge or Warm Up:  Have something for the students to do when they enter the room, after they read the Opening Message and respond to the question – what next?  For younger students, have playdough, puzzles, books, or simple Jewish games (dominoes) out and ready to go.  Colored pencils or markers and blank paper – with a prompt.  Might even have simple collage materials, glue and a prompt to respond do.  A simple survey – to interview classmates. 

·       Greet Students at the Door:  Be at the door as students arrive.  Last week, I noticed one of our teachers standing at the door, greeting each student with a handshake, and then he directed the students to the next activity.  Each student feels welcomed and valued.  Wow.  But to do this, you have to be ready to go before the students arrive.  How – arrive early!

Teachers who are ready to go before the first student enters the room, report a more peaceful, less stressful day.  A day that starts well, tends to end on a good note. 
Remember to SMILE! J   


Monday, September 8, 2014

“QUIET! QUIET! QUIET!”

Recurring nightmare for a teacher:  Standing in front of a group of students asking them to be quiet and they totally ignore you!  Have you had that one?  I have… and even as an experienced educator, I wake up from this nightmare at the beginning of every school year.

Getting the classes’ attention is sometimes the scariest thing about being a new teacher.  What am I going to do if they don’t… well, listen to me?  What if they totally ignore me?  Even experienced teachers need to give some thought to how ‘make the kids listen’ (flickering lights, talking louder doesn’t work in the long run!).  Here are a few tried and true tricks of the trade:
1.       Find a quiet signal that will work for you.  You might have 2 – for different situations.  Ideas include:
·       Soft Noisemaker such as a chime (this is the perfect tool), rainstick, maraca,  tambourine:  Teacher instigates the noise.  Hold up your hand in a stop sign type mode.  Wait.  If you need to, make noise again. Wait.  Might need one more time.  Teacher is silent during this procedure.

·       Call – Response: Teacher has a set call, and Students have a set response.  For example:
T: Sh’ma  S: Yisrael; T: Chitty Chitty S: Bang, bang; T: Am Yisrael, Am Yisrael  S: Chai  For more ideas (secular):

·       Clap or Hand Snap Call Response:  T:  claps a simple rhythm S: claps rhythm back (this repeats with slightly harder rhythms).  Some teachers do this and speak: “If you can hear me clap once” 


·       Hand Up:  T: without talking raise hand as if to indicate Stop.  Wait quietly.  S:  as they see the QUIET HAND SIGNAL, raise own hand and become still and quiet.  T: Continue to wait with QUIET HAND raised.  S: more and more will realize the room has grown quiet and raise hands.

2.       Teach and Practice the Quiet Signal:  In the first few class sessions, establish your quiet signal by teaching it to your class.  Have them practice.  This means you tell them you will practice, and what your quiet signal will be. Direct everyone to be ‘noisy’; use quiet signal.  Discuss.  Do it again.  And again.  Acknowledge appropriate behavior.  “I noticed that it didn’t take long to get quiet.” 

3.       Wait until everyone is quiet before talking…. Really, everyone… ALL of the students, the madrich, the visitor in the back of the room.  #1 mistake teachers make is talking while the students are talking.  You might use a quiet voice and say, “I am waiting to see that everyone is ready.”

4.       NEVER… I don’t like to use negatives, but really NEVER raise your voice.  Instead get softer and softer.  I promise, the class will get quieter.  It might take a few minutes, but students will slowly get quieter than you.  Try it.  Once the room is quiet, resume a normal speaking tone.


And finally, use your quiet signal.  Again and again.  Soon you will look like a pro!


Monday, September 1, 2014

Routines and Procedures... Oh My!


One of my pet peeves when I walk into a classroom, is tripping over backpacks that have been left on the floor.  Another pet peeve is students sharpening pencils while I am talking.  What’s yours?

Prevention – by establishing and teaching routines and procedures, you will eliminate many of these pesty classroom behaviors. Well almost. Here’s how:

1.   Before the school year starts think through a day in your classroom.  What will be the routines and procedures that will keep your class on a smooth track?  Make a list.  Ideas include:

·       Putting away coats and bookbags, taking out materials- NOTICE this is #1 for me
·       Sharpening pencils or getting supplies – My #2     

·       Moving from the chairs to the floor (and back again)
·       Lining up to go to Shira (music) or another “special”
·       Going to the restroom
·       Arrival: seating arrangements, attendance, assignments
·       Snack time
·       Discussions (raising hands or  not, waiting, listening politely, etc)

2.    Choose 3 – 4 routines or procedures to focus on the first few sessions of school.  Visualize what you want the students to do. Walk it through in your head.  Break the procedure down into short steps, with you giving directions on the way.  This is what you will teach your students.  For example:  Moving from sitting at seats to the carpet area (or to find a partner or to line up)…

·       T: Stand up and push your chairs in. Teacher waits for all students to stand behind their chairs that are pushed under the table.
·       T: When I give the signal, walk quietly to the carpet area and stand at the edge.  T gives the signal and students walk to the edge of the carpet and remain standing.
·       T:  Find a spot on the carpet, where you can sit comfortably and then sit crisscross. T gives the signal and students find a place on the carpet and sit down crisscross.
·       T: Thank you for following the directions for coming to the carpet.  Going to the carpet in this manner will keep our class organized and safe.  Now let’s practice going back to our seats.

3.    Teach, practice and reinforce.  Over the first few class sessions, take the time to teach these important routines and procedures.  Practice the routine.  Make it fun, add music or goofy movements.  Acknowledge successes by stating “I noticed that everyone came quietly and quickly to the carpet.” 

4.      Whoops… So of course these new skills take time to learn, and kids are kids.  Routine seems to be ‘noisy’ or forgotten?  Stop.  Reteach and practice again. 

5.      Reminders:  As your class is about ready to use a newly learned skill (or later in the year as a reminder), ask students to remind the class of the procedure.  This will trigger their memories and set the expectations for the new behavior.


Teach the routine, practice, reinforce, practice again, reminders (student to student)...